Sunday 28 March 2010

Blog 38 2nd Studio shoot.(Low key images conclusion)

This was hard!! Not for the squeemish!


That's right, this was a lot harder than I thought, this was nothing how I envisaged it to be

I had pre-planned all of my shots and poses but had totally underestimated the length of time and effort that is required just to complete just one decent low key image

With low key images,there are no set rules and a lot of this work is down to trial and error. I found I was constantly changing the my light sources, light intensity's, F stops and camera position. This was very time consuming

It is very rewarding when you achieve some good end results but I found you need to designate a considerable amount of time even for a basic low key image


Shown below are some shots of my studio setup at the college before I progressed with my photography session. The images show me setting up various lighting sets to illiluminate my model my Niece Hannah

The images show me setting up the lighting with barn doors and snoots attached to to the flash heads to achieve various lighting effects


I encounterered various unfoeseen prolems with this kind of photography

Focusing is extremely difficult. Auto focus goes out of the window and manual is very hard as there is hardly a light source on your subject that you can lock on to to focus

Darkness Working in the dark wasted a lot of time, I was constently turning the main studio lights back on to focus and check everything was in place before I took a shot

Time: To produce a decent set of low key images for this course would take an enormous amount of time so I have compromised and produced a set of 10, which are far from my best effort but will hopefully allow me let me to meet the criteria to pass the course

I thing I may have biten off more than I can chew with this particular subject and think that I may have needed a little more studio experience before I attempted this kind of project. I have no regrets though and found it to be an invalueble learning experience. It has definitely expanded my experience of using a studio and  given me a better understanding of photographic lighting.


The images below show some of my efforts and comparrisons with other photographers work
Shown below(left) a beautiful image taken fron the net which gave me inspiration which I hoped to emulate
Shown below (right) is my interpretation of this kind of image


Shown here on this page are some shots of inspiration and some of my efforts to emulate this kind of work


Shown below is my image on the left                                                        The original that I found on the net


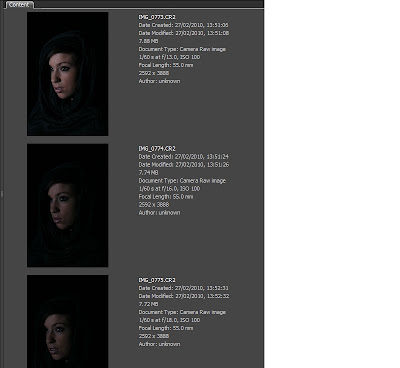
Shown below is a screen grab of the original image taken from Adobe bridge. The shot was taken with my canon 17-55 wide angle zoom lens at 100 IS0, F4.0, shutter speed 1/60th. I tried the shot at F2.8 but this let in to much light and burnt out the sillouette. I did try other F stops such as 5.6 and 8.0 but this reduced the light source to much to produce the sillouette. F4 was the optimum aperture allowing just enough depth of field to keep the models face in focus


The image above that I tried to emulate was very difficult to reproduce. It took me about 30 mins to achieve the desired lighting effect which was also tweaked in photoshop.

Saturday 27 March 2010

Blog 37 2nd Studio shoot (Low key images planning)

Shown here on this page are some ideas I have put together for my 2nd photo shoot in the college studio

I hope to produce my final 10 images from this particular shoot
My niece Hannah will be coming into the studio again to model for me


I like this particular effect shown in  this image below although it appears to have been finished in photoshop


I like this kind of idea shown below in this image,lighting 2 different elements within one image. I hope to play around with is kind of idea but feel I may be limited with studio time as lighting two subjects at once may be very time comsuming


For this particular shoot I will be experimenting with lighting my subjects from different angles. I want to try to illumminate my model from the rear of her head giving the illusion of a silloutte as shown in this example here


I will try to create a low key sillouette with lighting from behind my model. I intend to blow a fan on to the front of my models face then light her hair from behind her head as her hair dances through the breeeze of the fan


 I like this particular shot, it portrays an air of mystique and intrigue


I love this particular shot of just a slight sillouette on this persons face. I will definitely have a go at replicating this sought of image


I intend to take a mirror into the studio and experiment with some reflections


I may experiment with lighting 2 elements in one image, lighting the main subject in the foreground then lighting a 2nd subdued element in the rear


Saturday 13 March 2010

Blog 30 Bowens Lighting video's

Shown below is a really good lighting video taken from youtube. It gives tuition on studio lighting for a fashion photography shoot. Although the fashion part is not relevent to my course topic the tuition on the the lighting is excellent.


This is a very good video which shows a studio using Bowens lighting heads very similar to the ones that I use in our college studio. It details lighting diagrams with correct posisioning of lighting and positions of where your model should stand. It also shows correct exposures and histograms readings and a whole variety of other tips. An extra bonus, it's filmed by 2 english guys, not your normal american junk and yes  a british company


There is also a link to the Bowens lighting web page which has loads of good tips and guidaence on studio photography and contains a whole range of video's on studio lighting.

I have found this research very relevent and useful for my course here at the college, I hope other classmates will find this of use

http://www.youtube.com/user/bowenstv


http://www.youtube.com/watch?v=-2v3MrnDrQw

http://www.youtube.com/watch?v=gsUGbdT1hUc

Saturday 6 March 2010

Blog 26 Reflection of my 1st photo shoot in the college studio

Low Key image practice


From This 


         To This


Shown here are some photo's of my niece Hannah who kindly agreed to model for me for my first studio session at the college.


The top photo shows my model Hannah in the studio before I started  the session.This photo was the starting point from my first light metre reading in the studio which read 5.6. As you can see the photo was very overexposed and totally washed out.


The bottom image above demonstarates what I achieved after some experimentation and a lot of patience


Please read the pages below which detail how I changed lighting and camera settings to achieve some quite pleasing low key image results


My first photo shoot using the college studio proved to be a very good learning curve to help me to produce some images of this type of photography.


I had pre arranged for my 19 year old niece Hannah to come in to the studio and pose as a model for me for this photo shoot. Hannah is very friedly, so it was easy to build up a good rapour with her and made it far easy for me to feel at home with my model


I have only ever used the college studio once before so this first session seemed very daunting and I was feeling very nervous. I'm mainly an outdoor photographer and a photoshop man so I wasn't looking forward to the session. I asked some fellow students to accompany me into the studio Eric and Pip. This I found really helpful and I would recommend it the first time you use the studio if you feel nervous in anyway. They were able to assist me and Eric, having used the studio before gave me some invaluable tips to help with the lighting setup


Tip of the day. I put on some low background music on the mac in the studio. This I found helped both me and my model to relax and produced a layed back sort of atmosphere


Planning


The type of images I wanted to produce were very low key images of faces or portraits. I only wanted just a hint of light to reflect off the models face, shown below here are a couple of examples that gave me inspiration. I copied these from the net, they are not taken by any particular photographer but I would like to emulate these types of images


I will be considering changing some of my images to grey scale after the shoot to give me more options and to improve my creativity. I first made some plans before I went into the studio and had sourced some images off the net which gave me some inspiration and ideas. I knew exactly what lighting I wanted to achieve and the poses that I wanted my model to perform before I set foot in the studio. It was very important to pre plan the whole shoot so I didn't waste any time in the studio. I would recommend this approach to anybody using the studio and is essential as not to waste studio time.

Equipment

I used my own camera, a Canon 400d body with a 17-55mm wide angle L series lens. I choose this lens because I wanted to get up close to my subject for some nice portraits. This lens is very fast having a max F stop of 2.8. This was synced to the two college lighting heads by the use of a wireless flash sync transmitter attached to my hotshoe interface on the top of my camera


I used the colleges new heavy duty flexible tripod to mount my camera for the shots. This is a very good piece of equipment which is easily adjustable and surprisingly easy to move around the floor. It can be manoeuvred in all directions and adjusted to move in real close to your subject

Posing my model

Lighting my model to acquire the desired light effects proved a lot more difficult than I anticipated. I did eventually get the results that I wanted but this took some considerable time and a lot of experimental exposures.

Shown here is a basic studio plan which shows all the equipment positions that I used to photograph my model. Shown also are a some photos of my model hannah and my studio set up


I didn't need much equipment just 1 lighting\flash  head with barn doors atached. A black curtain drape and the camera with a radio sync adapter attached  to trigger the lighting\flash head


I first set up my model, my niece Hannah sitting on a stool in the middle of the studio and positioned a black backdrop curtain about 5-6 feet behind her. I knew I wanted the studio in total darkness and wanted to use just one source of light. I used one of the studio's flash/lighting heads to start with to light my models face from the left hand side as I looked at her through the camera.


It was trial and error at first and the lighting seemed a little harsh and was flooding the whole of my model's body. As I only wanted to illuminate just the side of my models face in one particular area I tried using the barn doors attached to the lighting head. This made a massive amount of difference and I was able to direct and concentrate the light source directly on to the desired spot of my model's face. I then reduced the light source intensity by turning down the flash and ambient light controls on the side of the lighting head. I had now roughly achieved the desired lighting effect that I desired


I took a light meter readings using the college light meter which gives an incedent teading. I know that this meter is more accurate then using my camera's in built reflective meter. Add Image


I set up the meter at 100 ISO. This is my lowest camera ISO setting and the one I wanted to use as I wanted my images to be pin sharp and didn't want any noise in my shots. I spoke with my tutor Mr Steve and he recommended that I use a shutter speed of 1/60th or i/125. I took the first meter reading, one from the front of the model's face which read F 5.6 and one from the side of the models face where the light source was directed. This second reading read F 8


Shown below is one of my starting images. This shows me using the college lighting meter to set up my fist image. The light was far to intense so I new I had to change things


I experimented with the lighting and different apertures shown in the 3 images below. I wasn't achieving the correct lighting effect and correct exposure so I needed to change something.


I had my model in the correct position and the lighting falling on her face was in the right place,it was the intensity of the light reaching the models face which wasn't right. I did try adjusting the intensity of the light source but still could'nt achieve the desired effect I wanted


I decided to change the aperture size or F stop to create the desired lighting effect that I required. Shown here in the bottom image at F 18 there wasn't enogh light reaching my subjects face, by increasing the aperture size to F 16 as shown in the second image let in even more light.


This second image still appeared to be too dark so I decreased the F stop even lower to F 13 which opens up the aperture even more letting in more light. This was the ideal F stop for this particular shot producing the correct lighting effect on my subject


Problems and recommendations

You need total darkness in the studio to produce this type of photography and this did cause some problems. You can't see a thing and trip hazards become apparent


I would recommend a torch or even a strap on head torch which I used to view camera settings and to help find my way around the studio.I would also recommend the help of a colleague to assist with props,turning on/off and adjusting lighting and to assisting your model with different poses This helps to free up your time and leaves you to get on with the photography and experiment with exposures and camera settings.I know the next time I use the studio I will have a little bit more confidence and experience of using the equipment which should enable me to produce some even better images


The session got easier as I went along. Gaining more confidence as I became more familiar with the equipment this has proved to be a invaluable experience of using a photographic studio.


Shown here are a few of the final images taken on the day. I have booked the college studio again in about 3 weeks time. On this second shoot I hope to produce the final 10 images for this subject


I f